You have three possibilities to add Bootstrap into your Larval Project
Methode 1: Adding Bootstrap by a Link to CDN
Using CDN (Content delivery network) is quite easy and simple for beginners. CDN is a network of servers providing the source files for almost every library used in front-end development.
We need the references for bootstrap.min.css and bootstrap.bundle.min.js
You add Bootstrap by inserting the following code snippets in your main Laravel Page.
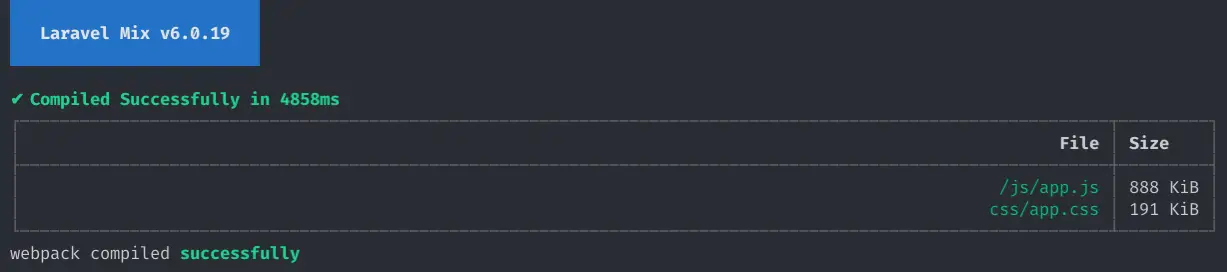
In Laravel, all Frontend Modules are handles with Laravel Mix. This is an elegant wrapper around Webpack, a Package manager for installing and managing node modules.
To use Mix, you need to install NodeJS and NPM.
After this, install all required modules of your starter project
npm install
If you can see node_modules folder, this means npm is working.
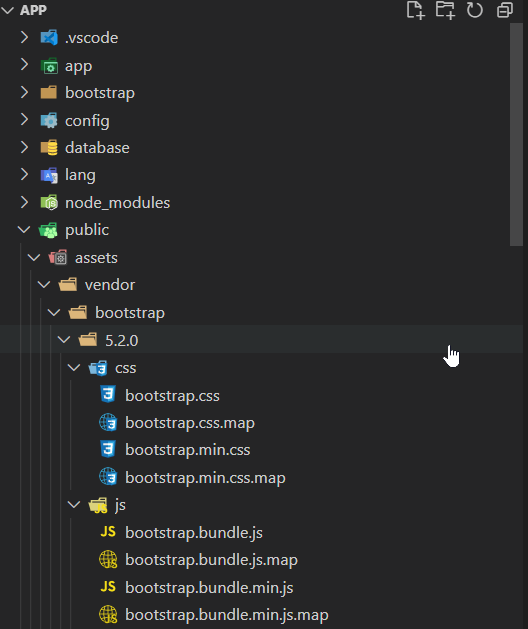
Now we need to install bootstrap and the required modules
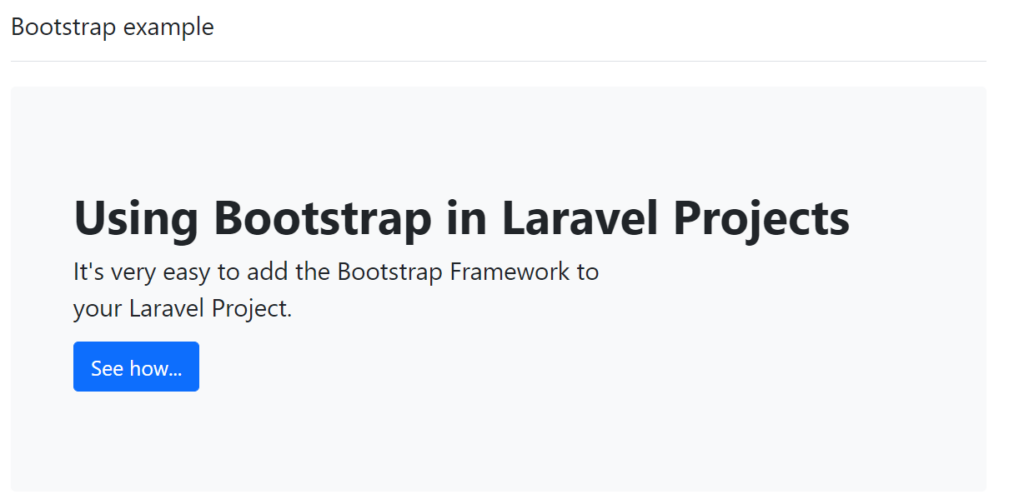
With the Bootstrap Framework installed, now we can style our Pages. An overview of what you can do could be found in the Documentation or using the Examples.
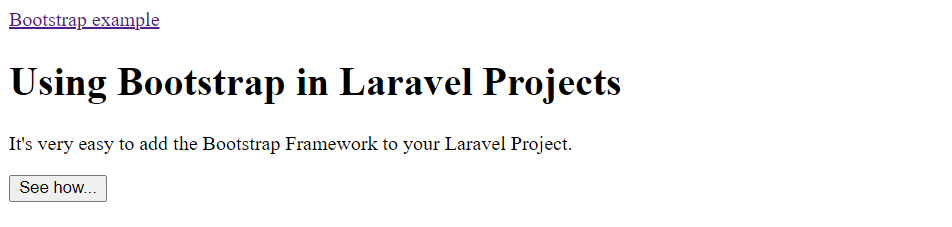
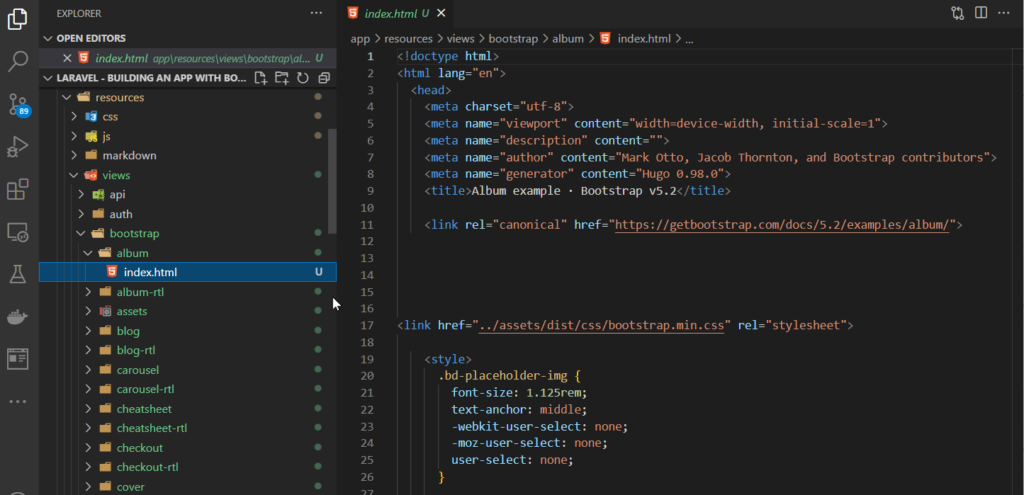
We will work with the Examples, so download all examples to the folder resources/views/bootstrap
With the Commandline and PowerShell, you could do this: Change to the folder and download the Archive with the examples
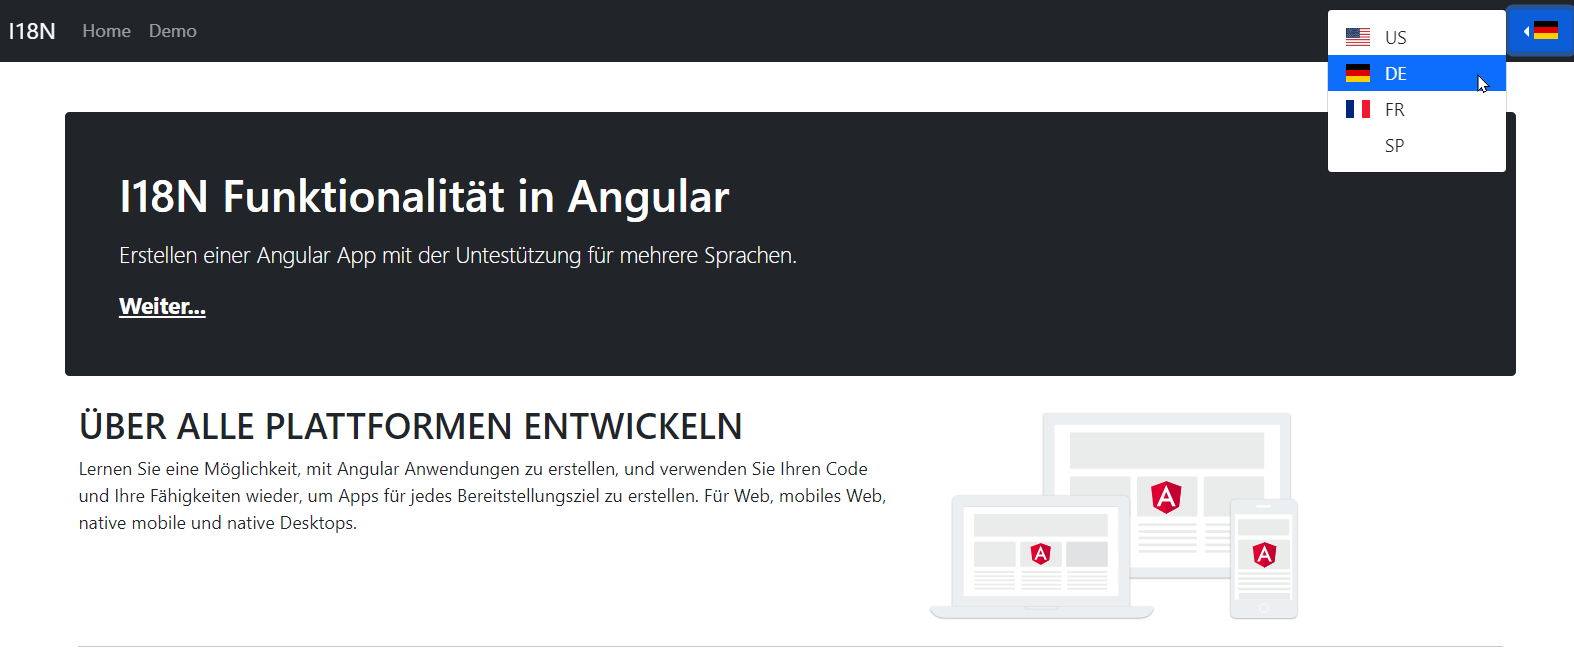
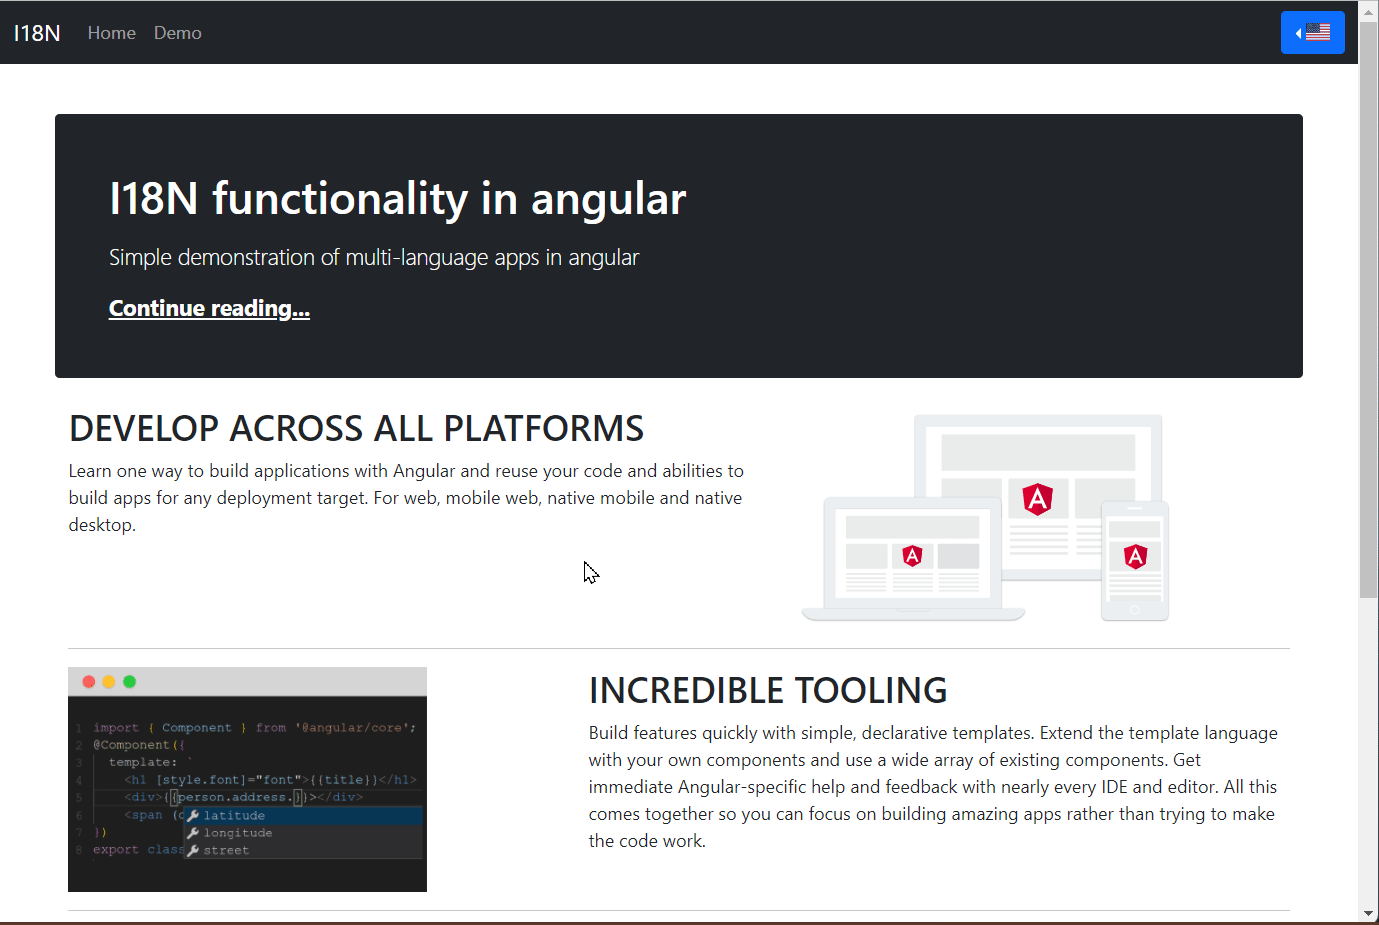
In this post, you will learn how to get started with Angular I18n using ngx-translate, the internationalization (i18n) library for Angular. We will cover the following topics:
setup new angular app
install required dependencies
add bootstrap as ui framework
create app with demo page and translation services
This will be the final result (click to show video). Source code for this post is on GitHub.
import { NgModule } from '@angular/core';
import { BrowserModule } from '@angular/platform-browser';
import { HttpClient, HttpClientModule } from '@angular/common/http';
import { AppRoutingModule } from './app-routing.module';
import { AppComponent } from './app.component';
import { TranslateLoader, TranslateModule } from '@ngx-translate/core';
import { TranslateHttpLoader } from '@ngx-translate/http-loader';
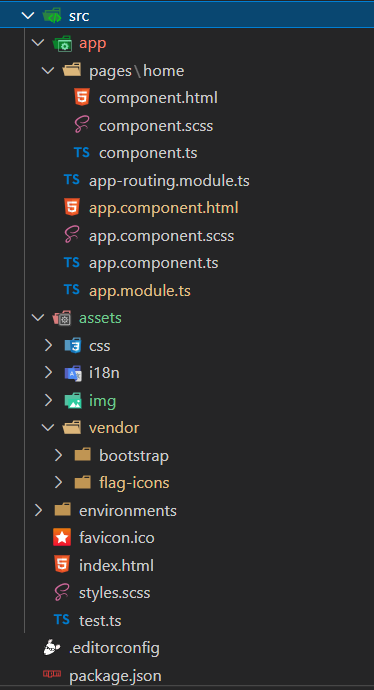
import { HomePageComponent } from './pages/home/component';
import { DemoPageComponent } from './pages/demo/component';
@NgModule({
declarations: [AppComponent, HomePageComponent, DemoPageComponent],
imports: [
BrowserModule,
AppRoutingModule,
HttpClientModule,
TranslateModule.forRoot({
loader: {
provide: TranslateLoader,
useFactory: HttpLoaderFactory,
deps: [HttpClient],
},
}),
],
providers: [],
bootstrap: [AppComponent],
})
export class AppModule {}
// required for AOT compilation
export function HttpLoaderFactory(http: HttpClient): TranslateHttpLoader {
return new TranslateHttpLoader(http);
}
How the app works
The translation is done with the ngx-translate component.
Translation works with different JSON files (for each language a separate file), containing the required translation for each text to be displayed. Each text is addressed with a name within the JSON file.
So, the base structure of each JSON file is the following:
Translation files
assets/i18n/de.json
{
  "i18n-demo-header": "I18N Demo",
  "header": "I18N Funktionalität in Angular"
}
assets/i18n/us.json
{
  "i18n-demo-header": "I18N Example",
  "header": "I18N Functionality in Angular"
}
These translations could be used in a html file by using the translate pipe:
bat is a cat clone with syntax highlighting and Git integration that works on Windows, MacOS and Linux. It provides syntax highlighting for many file extensions by default.
exa is a modern replacement for ls, the default command-line program in Unix/Linux for listing directory contents. exa supports icons with the --icons flag.
fd is a fast and user-friendly alternative to find, the built-in command-line program in Unix/Linux for walking a file hierarchy. fd provides opinionated defaults for the most common use cases. To find a specific file by name, you write fd PATTERN instead of find -iname ‘*PATTERN*’. fd is also extremely fast and it comes with a ton of options like ignoring hidden directories, files and patterns from .gitignore by default.
procs is a modern replacement for ps, the default command-line program in Unix/Linux for getting information about processes. It provides convenient, human-readable (and colored) output format by default.
sd is an intuitive find & replace command-line tool, it is an alternative to sed, the built-in command-line program in Unix/Linux for parsing and transforming text (). sd has simpler syntax for replacing all occurrences and it uses the convenient regex syntax that you already know from JavaScript and Python. sd is also 2x-11x faster than sed.
sed is a programmable text editor, with search and replace being a common use case. In that light, sd is more like tr, but on steroids. (thanks /u/oleid for the suggestion).
dust is a more intuitive version of du, the built-in command-line program in Unix/Linux for displaying disk usage statistics. By default dust sorts the directories by size.
ripgrep is an extremely fast alternative to grep, the built-in command-line program in Unix/Linux for searching files by pattern. ripgrep is a line-oriented search tool that recursively searches your current directory for a regex pattern. By default, ripgrep respects .gitignore and automatically skips hidden files, directories and binary files.
tokei is a program that displays statistics about your code. It shows the number of files, total lines within those files and code, comments, and blanks grouped by language.
hyperfine is a command-line benchmarking tool. Among many features, it provides statistical analysis across multiple runs, support for arbitrary shell commands, constant feedback about the benchmark progress and current estimates and more.
zoxide is a blazing fast autojumper, intended to completely replace the cd command. It allows you to change directories without typing out the entire path name.
delta is a viewer for git and diff output. It allows you to make extensive changes to the layout and styling of diffs, as well as allowing you to stay arbitrarily close to the default git/diff output.
Tp-Note is a template tool that enhances the clipboard with a save and edit as a note file function. After creating a new note file, Tp-Note launches the user’s favorite file editor (for editing) and web browser (for viewing).
nushell is a new type of shell, written in Rust. Its goal is to create a modern shell alternative that’s still based on the Unix philosophy but adapted to the current era. It supports piping and filtering in a way similar to awk and sed with a column view so that you can combine operations like in SQL. (thanks /u/matu3ba for the suggestion).
Hinweis: der Befehl startproject erstellt einen Ordner project, indem er einen weiteren Ordner project erstellt. Der erste Ordner dient dazu, sowohl das Django-Projekt, als auch die erstellten Anwendungen an einer gemeinsame Stelle zu speichern.
Der zweite Ordner project ist das Django-Projekt, in dem sich alle für das Projekt notwendigen Dateien befinden.
Wird in den nachfolgenden Beschreibungen vom dem Ordner project gesprochen, so ist immer der zweite gemeint (project/project)
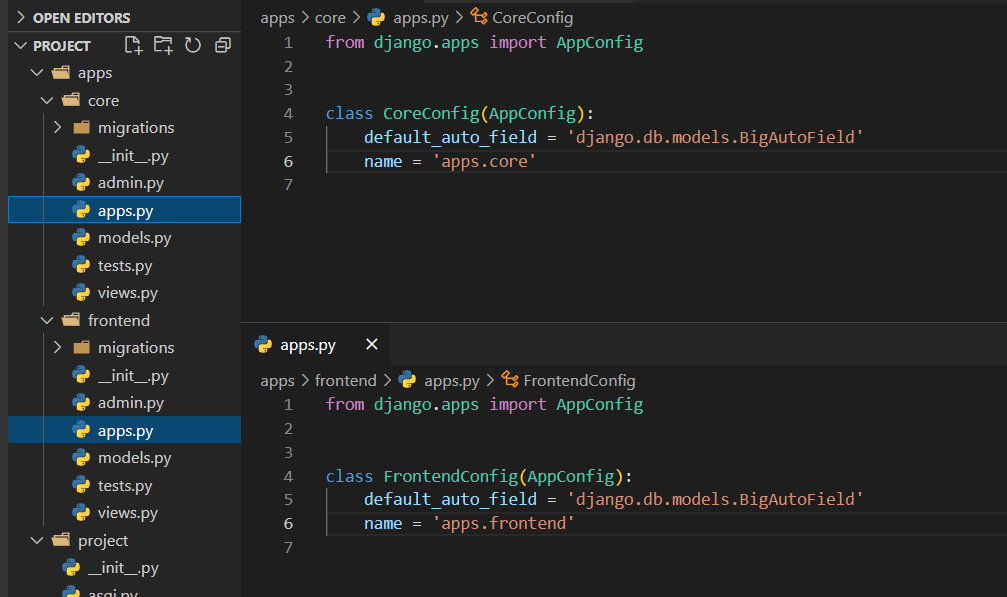
Im nächsten Schritt werden die beiden erstellten Anwendungen (Core und Frontend) dem Django-Projekt hinzugefügt. Da sie in einem Unterverzeichnis (apps) liegen, muss ihre Konfiguration angepasst werden.
In dere Datei apps.py der jeweiligen Anwendung (apps/core/apps.py und apps/frontend/apps.py) wirr der Name angepasst:
Hinweis: Ohne diese Anpassung würde beim Start des Servers eine Fehlermeldung angezeigt
django.core.exceptions.ImproperlyConfigured: Cannot import 'frontend'. Check that 'apps.frontend.apps.FrontendConfig.name' is correct.
Im Anschluss daran werden die beiden Anwendungen dem Projekt hinzugefügt. Dies erfolgt in der Datei project/settings.py:
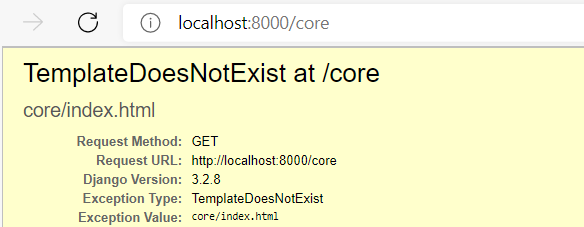
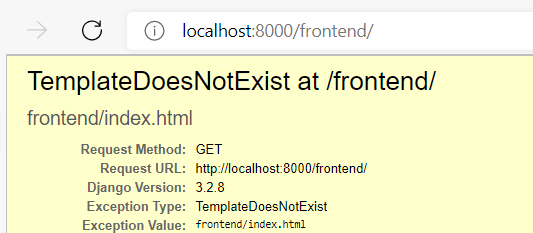
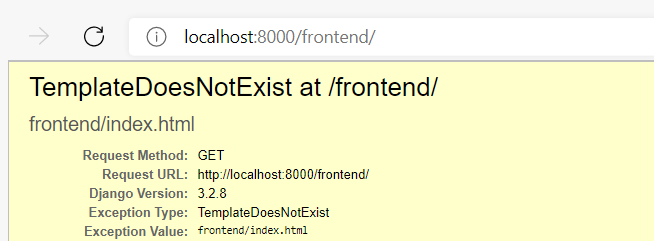
Im unteren Teil der Fehlermeldung findet sich aber eine hilfreiche Information:
Als erstes wir uns mitgeteilt, das ein gewünschtes Template in der nachfolgenden Reihenfolge gesucht wird. Es werden als (wir oben bereits erwähnt) mehrere Verzeichnisse durchsucht, um ein passendes Template zu finden.
Template-loader postmortem
Django tried loading these templates, in this order:

Using engine django:
Als erstes werden Verzeichnisse der Django-Installation durchsucht. Hierunter liegen z. B. die Templates für die Administration oder die Anmeldung.
django.template.loaders.app_directories.Loader:
...\lib\site-packages\django\contrib\admin\templates\frontend\index.html (Source does not exist)

django.template.loaders.app_directories.Loader:
...\lib\site-packages\django\contrib\auth\templates\frontend\index.html (Source does not exist)
Im Anschluss werden dann die Verzeichnisse unserer Anwendungen durchsucht.
django.template.loaders.app_directories.Loader: ...\project\apps\core\templates\frontend\index.html (Source does not exist)

django.template.loaders.app_directories.Loader: ...\project\apps\frontend\templates\frontend\index.html (Source does not exist)
Um nun ein gewünschtes Template zu finden, werden zwei Informationen benötigt:
der Name des Template
das Verzeichnis
Name des Templates
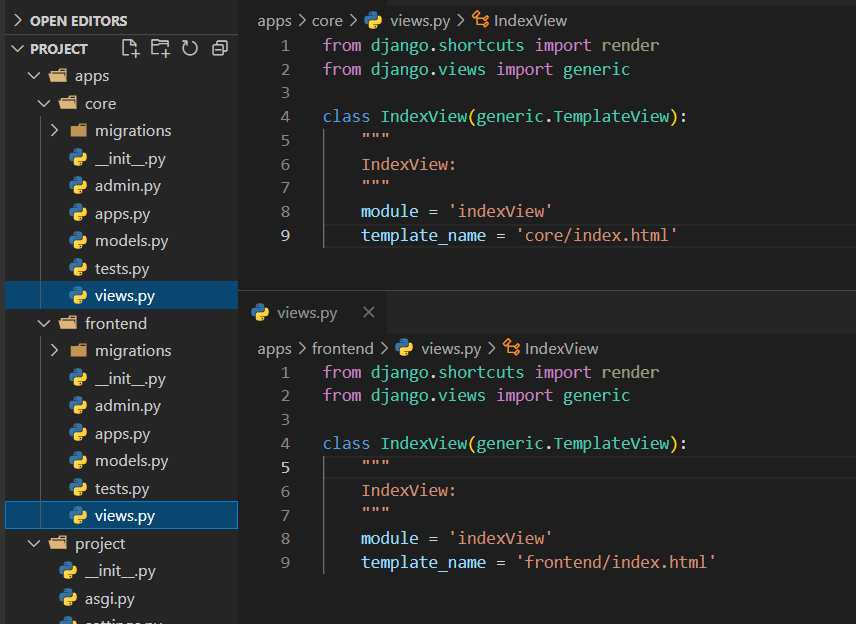
Der Name des Templates wird im View angegeben: apps/core/views.py:
class IndexView(generic.TemplateView):
    module = 'indexView'
    template_name = 'core/index.html'
Verzeichnis
Das Verzeichnis selbst wird über die Suchreihenfolge der zu verwendenden Template-Verzeichnisse ermittelt. Das erste Verzeichnis, dass das gewünschte Template beinhaltet, wird verwendet.
Ermitteln des Verzeichnisses
Im Falle unserer Anwendung frontend werden die nachfolgenden Verzeichnisse durchsucht, ob sie das Template core/index.html beinhalten:
Umgebung
Verzeichnis
Template gefunden
DJANGO
lib\site-packages\django\contrib\admin\templates
DJANGO
lib\site-packages\django\contrib\auth\templates
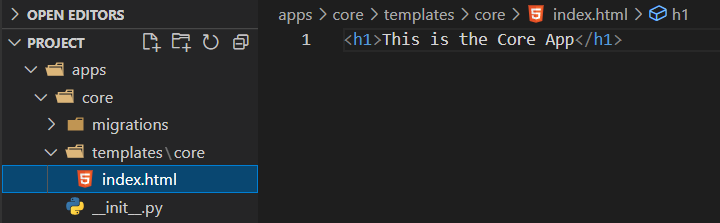
PROJEKT
project\apps\core\templates
core/index.html
PROJEKT
project\apps\frontend\templates
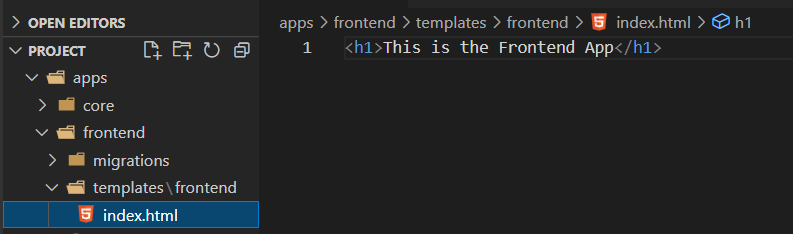
Template hinzufügen
Erstellen eines Templates für die Anwendung frontend: apps/frontend/templates/frontend/index.html
Weiteres Beispiel: Suchen des passenden Templates
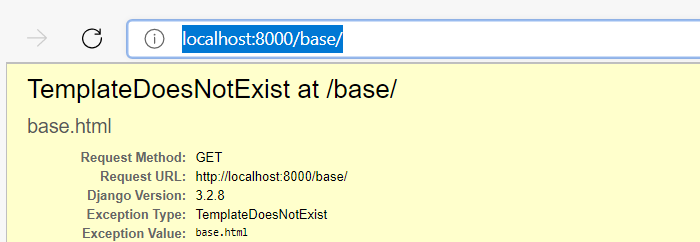
Richten sie einen Neuen View in der Anwendung frontend ein: apps/frontend/views.py
class BaseView(generic.TemplateView):
    module = 'baseView'
    template_name = 'base.html'
Erstellen Sie eine URL für diesen View in project/urls.py
Wie zu erwarten war, wird das Template nicht gefunden:
In keinem der bekannten Verzeichnisse gibt es ein Template base.html.
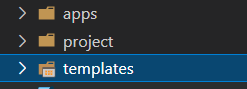
Gemeinsame Templates für alle Anwendungen
Um Templates einzurichten, die von mehreren Anwendungen verwendet werden, empfiehlt es sich, ein Verzeichnis templates auf der gleichen Ebene, wie die Anwendungen, einzurichten
In der Datei project/settings.py wird dieses Verzeichnis dem Django-Projekt hinzugefügt.
Das zusätzliche Verzeichnis wird nun auch durchsucht:
Template-loader postmortem
Django tried loading these templates, in this order:

Using engine django:
django.template.loaders.filesystem.Loader: ...\project\templates\base.html (Source does not exist)
django.template.loaders.app_directories.Loader: ...\.venv\lib\site-packages\django\contrib\admin\templates\base.html (Source does not exist)
django.template.loaders.app_directories.Loader: ...\.venv\lib\site-packages\django\contrib\auth\templates\base.html (Source does not exist)
django.template.loaders.app_directories.Loader: ...\project\apps\core\templates\base.html (Source does not exist)
django.template.loaders.app_directories.Loader: ...\project\apps\frontend\templates\base.html (Source does not exist)
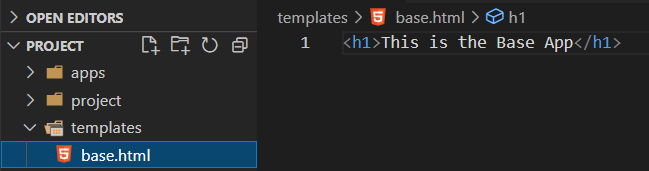
Erstellen Sie nun in diesem Verzeichnis (templates) das Template base.html
Add line to file src/main/resources/application.properties
server.port=9010
Rest Api
Get JSON Data from a remote Rest Server
final RestTemplate restTemplate = new RestTemplate();
final String response = restTemplate.getForObject("https://httpbin.org/ip", String.class);

System.out.println(response);
Pipenv ist ein Tool, das darauf abzielt, das Beste aller Verpackungswelten (Bündel, Composer, NPM, Cargo, Garn usw.) in die Python-Welt zu bringen. Windows ist in unserer Welt ein erstklassiger Bürger.
Es erstellt und verwaltet automatisch eine virtuelle Umgebung für Ihre Projekte und fügt Pakete zu Ihrer Pipfile hinzu/entfernt sie, während Sie Pakete installieren/deinstallieren. Es generiert auch das immer wichtige Pipfile.lock, das verwendet wird, um deterministische Builds zu erstellen.
Die Probleme, die Pipenv zu lösen versucht, sind vielschichtig:
Sie müssen pip und virtualenv nicht mehr separat verwenden. Sie arbeiten zusammen.
Die Verwaltung einer Requirements.txt-Datei kann problematisch sein, daher verwendet Pipenv Pipfile und Pipfile.lock, um abstrakte Abhängigkeitsdeklarationen von der zuletzt getesteten Kombination zu trennen.
Hashes werden immer und überall verwendet. Sicherheit. Sicherheitslücken automatisch aufdecken.
Empfehlen Sie dringend die Verwendung der neuesten Versionen von Abhängigkeiten, um Sicherheitsrisiken durch veraltete Komponenten zu minimieren.
Geben Sie Einblick in Ihr Abhängigkeitsdiagramm (z. B. pipenv graph).
Optimieren Sie den Entwicklungsworkflow durch Laden von .env-Dateien.
E:\> pipenv install fastapi
Installing fastapi...
Adding fastapi to Pipfile's [packages]...
Installation Succeeded
Pipfile.lock (16c839) out of date, updating to (4f56a0)...
Locking [dev-packages] dependencies...
Locking [packages] dependencies...
           Building requirements...
Resolving dependencies...
Success!
Updated Pipfile.lock (4f56a0)!
Installing dependencies from Pipfile.lock (4f56a0)...
  ================================ 0/0 - 00:00:00
To activate this project's virtualenv, run pipenv shell.
Alternatively, run a command inside the virtualenv with pipenv run.
Install all dependencies for a project (including dev)
E:\> pipenv install --dev
Pipfile.lock not found, creating...
Locking [dev-packages] dependencies...
Locking [packages] dependencies...
Updated Pipfile.lock (16c839)!
Installing dependencies from Pipfile.lock (16c839)...
  ================================ 0/0 - 00:00:00
To activate this project's virtualenv, run pipenv shell.
Alternatively, run a command inside the virtualenv with pipenv run.
Erstellen einer Lockdatei Pipenv.lock mit den aktuell installierten Releases
Überprüfen der installierten Abhängigkeiten auf Sicherheitslücken
E:\> pipenv check
Checking PEP 508 requirements...
Passed!
Checking installed package safety...
All good!
Ausführen eines Kommandos in der virtuellen Umgebung
E:\> pipenv run pip -V
pip 21.1.3 from C:\Users\rg.virtualenvs\app-pipenv-tgP0nh4t\lib\site-packages\pip (python 3.9)
Ausführen eines Pip-Kommandos
E:\> pipenv run pip freeze
fastapi==0.68.0
pydantic==1.8.2
starlette==0.14.2
typing-extensions==3.10.0.0
Kommandozeile
Optionen
--where            Output project home information.
--venv             Output virtualenv information.
--py               Output Python interpreter information.
--envs             Output Environment Variable options.
--rm               Remove the virtualenv.
--bare             Minimal output.
--completion       Output completion (to be executed by the shell).

--man              Display manpage.
--support          Output diagnostic information for use in GitHub issues.

--site-packages / --no-site-packages
                   Enable site-packages for the virtualenv.
                   env var: PIPENV_SITE_PACKAGES]

--python TEXT      Specify which version of Python virtualenv should use.

--three / --two    Use Python 3/2 when creating virtualenv.
--clear            Clears caches (pipenv, pip, and pip-tools).
                   env var: PIPENV_CLEAR]

-v, --verbose      Verbose mode.
--pypi-mirror TEXT Specify a PyPI mirror.
--version          Show the version and exit.
-h, --help         Show this message and exit.
We use cookies on our website to give you the most relevant experience by remembering your preferences and repeat visits. By clicking “Accept All”, you consent to the use of ALL the cookies. However, you may visit "Cookie Settings" to provide a controlled consent.
This website uses cookies to improve your experience while you navigate through the website. Out of these, the cookies that are categorized as necessary are stored on your browser as they are essential for the working of basic functionalities of the website. We also use third-party cookies that help us analyze and understand how you use this website. These cookies will be stored in your browser only with your consent. You also have the option to opt-out of these cookies. But opting out of some of these cookies may affect your browsing experience.
Necessary cookies are absolutely essential for the website to function properly. These cookies ensure basic functionalities and security features of the website, anonymously.
Cookie
Duration
Description
cookielawinfo-checkbox-analytics
11 months
This cookie is set by GDPR Cookie Consent plugin. The cookie is used to store the user consent for the cookies in the category "Analytics".
cookielawinfo-checkbox-functional
11 months
The cookie is set by GDPR cookie consent to record the user consent for the cookies in the category "Functional".
cookielawinfo-checkbox-necessary
11 months
This cookie is set by GDPR Cookie Consent plugin. The cookies is used to store the user consent for the cookies in the category "Necessary".
cookielawinfo-checkbox-others
11 months
This cookie is set by GDPR Cookie Consent plugin. The cookie is used to store the user consent for the cookies in the category "Other.
cookielawinfo-checkbox-performance
11 months
This cookie is set by GDPR Cookie Consent plugin. The cookie is used to store the user consent for the cookies in the category "Performance".
viewed_cookie_policy
11 months
The cookie is set by the GDPR Cookie Consent plugin and is used to store whether or not user has consented to the use of cookies. It does not store any personal data.
Functional cookies help to perform certain functionalities like sharing the content of the website on social media platforms, collect feedbacks, and other third-party features.
Performance cookies are used to understand and analyze the key performance indexes of the website which helps in delivering a better user experience for the visitors.
Analytical cookies are used to understand how visitors interact with the website. These cookies help provide information on metrics the number of visitors, bounce rate, traffic source, etc.
Advertisement cookies are used to provide visitors with relevant ads and marketing campaigns. These cookies track visitors across websites and collect information to provide customized ads.