Developer Blog

Tipps und Tricks für Entwickler und IT-Interessierte

Ionic | Create a simple Calculator

Sources for this tutorial are here.

Preparation

Clone the example

git clone https://github.com/ionic4-toolbox/App-Calculator.git

Starting from new

Before starting, make sure that you are using the current ionic version.If you are new to ionic , then look here for an installation guide.

npm -g install ionic@latest

Create App

ionic start Calculator sidemenu --type angular --no-link --no-git
cd Calculator

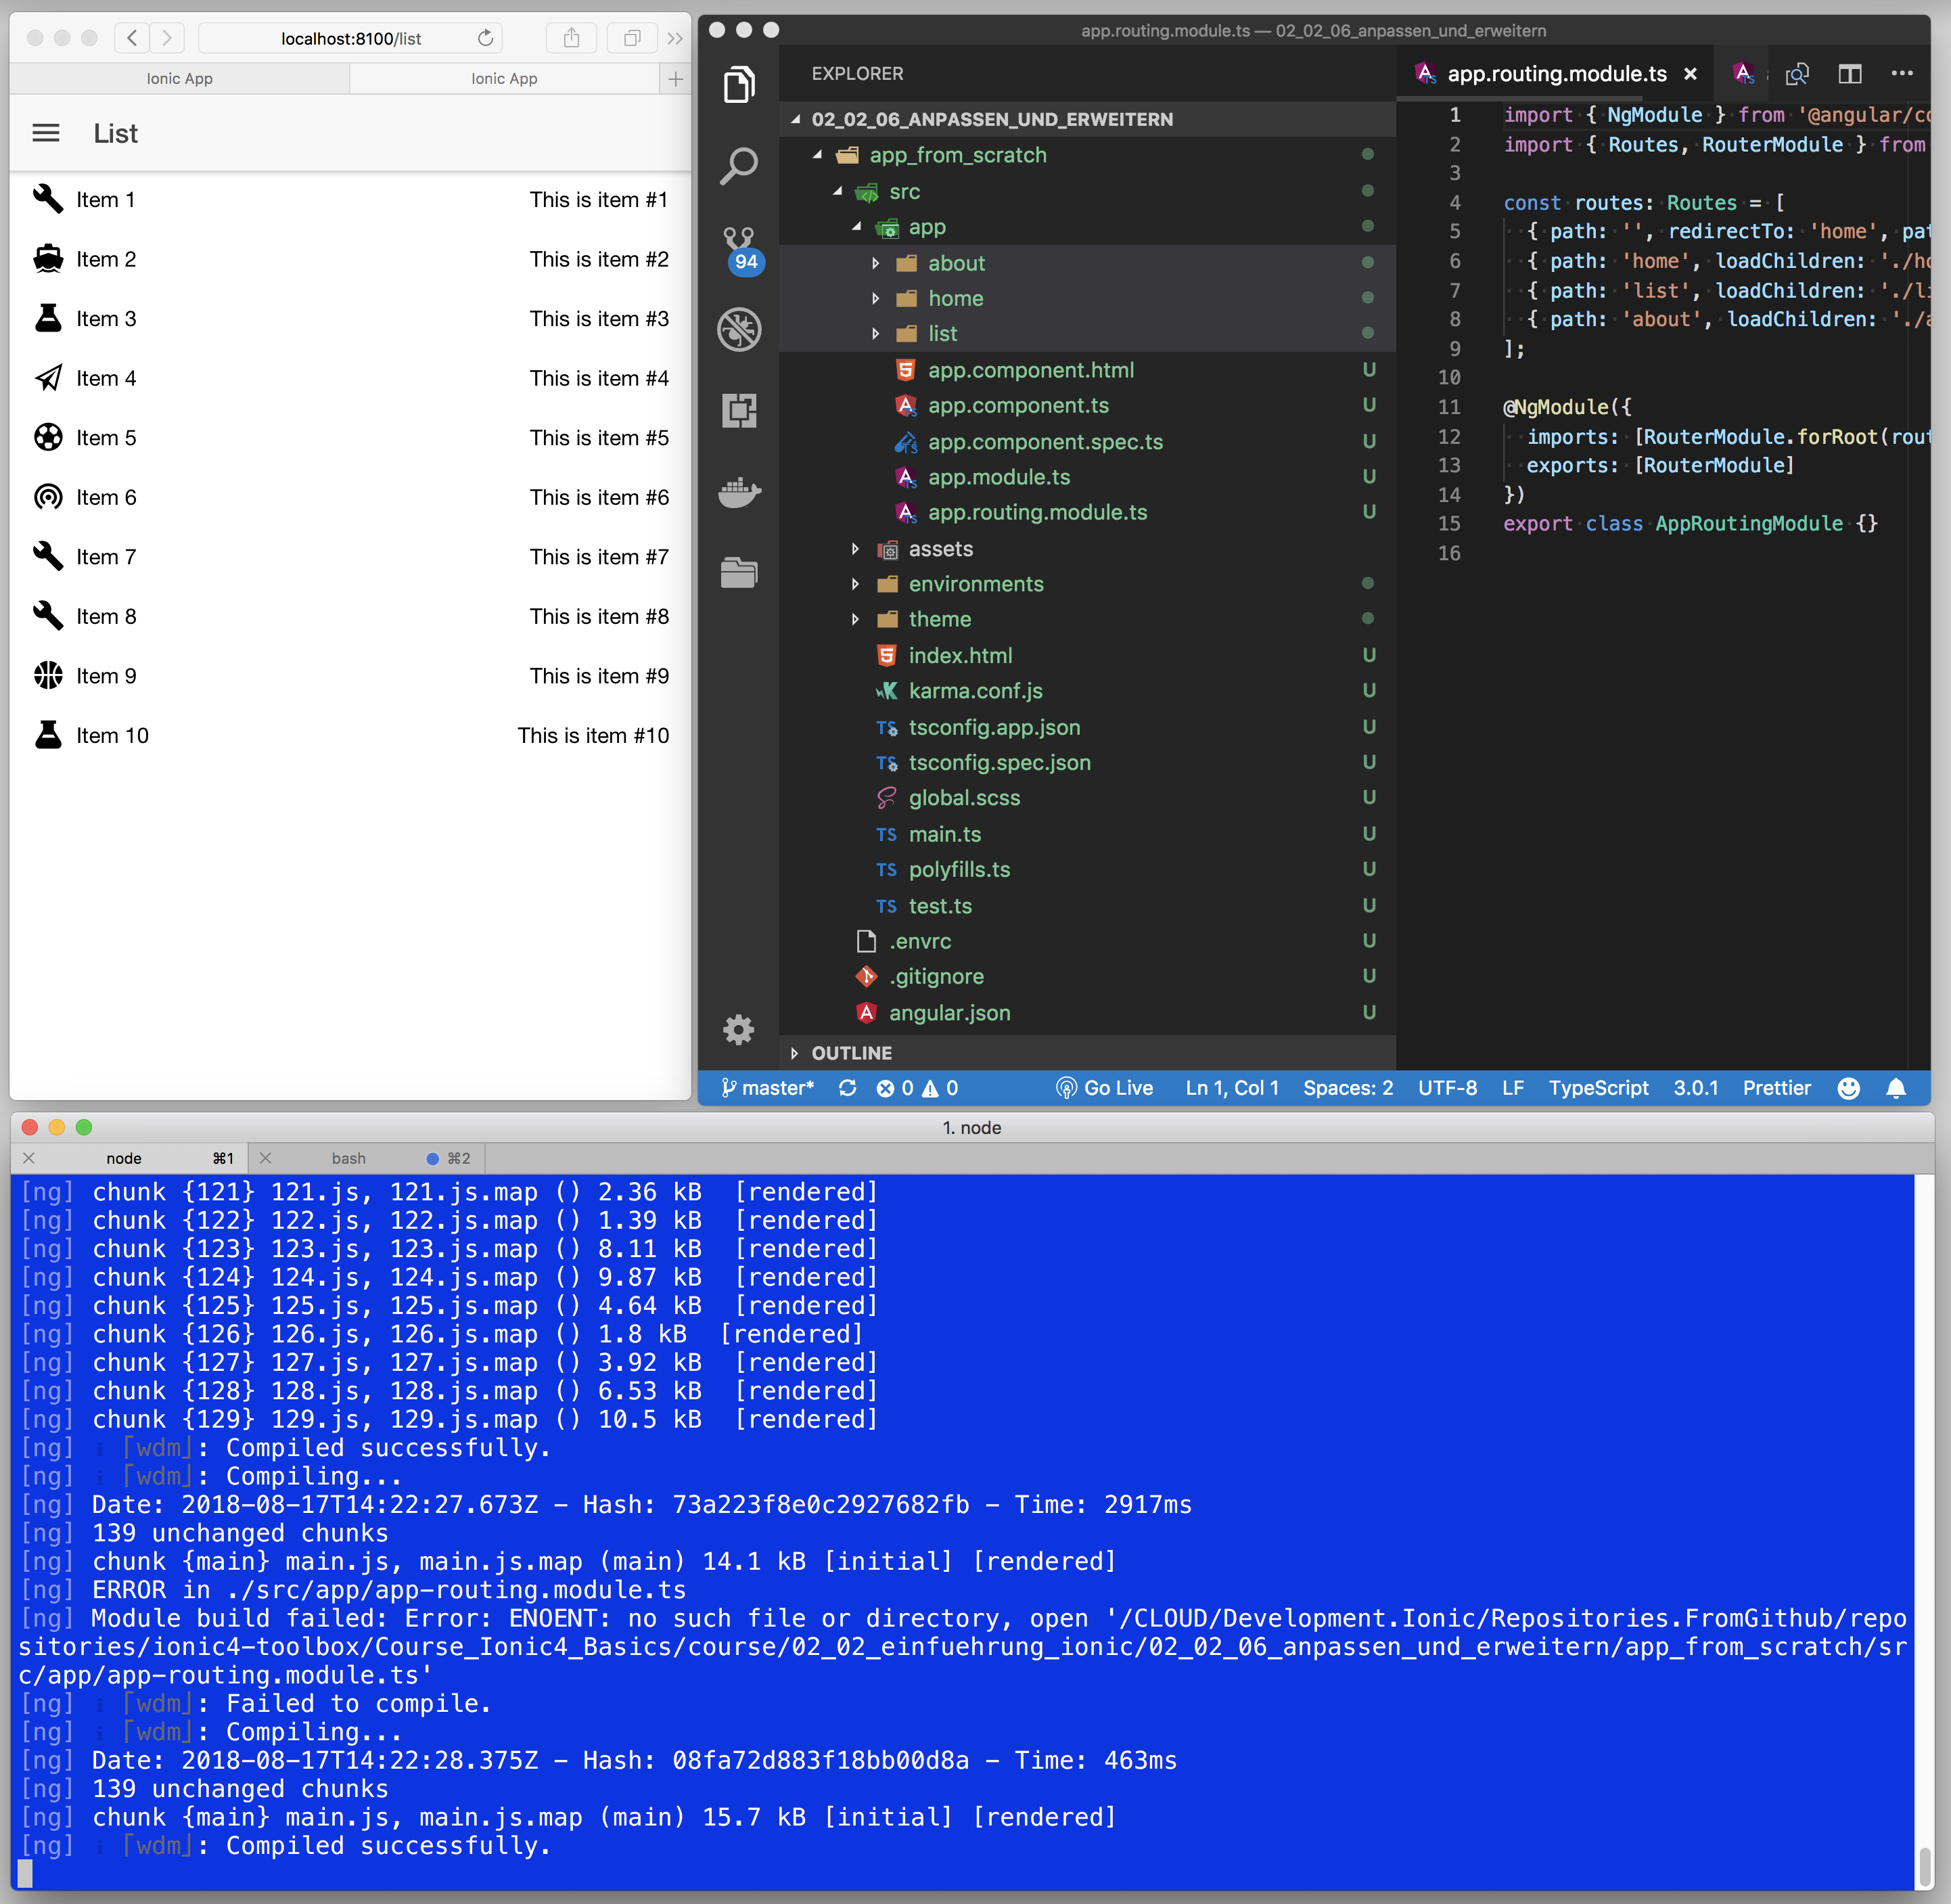
Add a new page for our calculator

ionic generate page Calculator

Add new page to sidemenu

Add link to page in app.components.ts file

  public appPages = [
    { title: 'Home', url: '/home', icon: 'home' },
    { title: 'List', url: '/list', icon: 'list' },
    { title: 'Calculator', url: '/calculator', icon: 'grid'
    }
  ];

Add calculation logic to typescript file

4public appPages = [
    { title: 'Home', url: '/home', icon: 'home' },
    { title: 'List', url: '/list', icon: 'list' },
    { title: 'Calculator', url: '/calculator', icon: 'grid' }
];

Add html layout

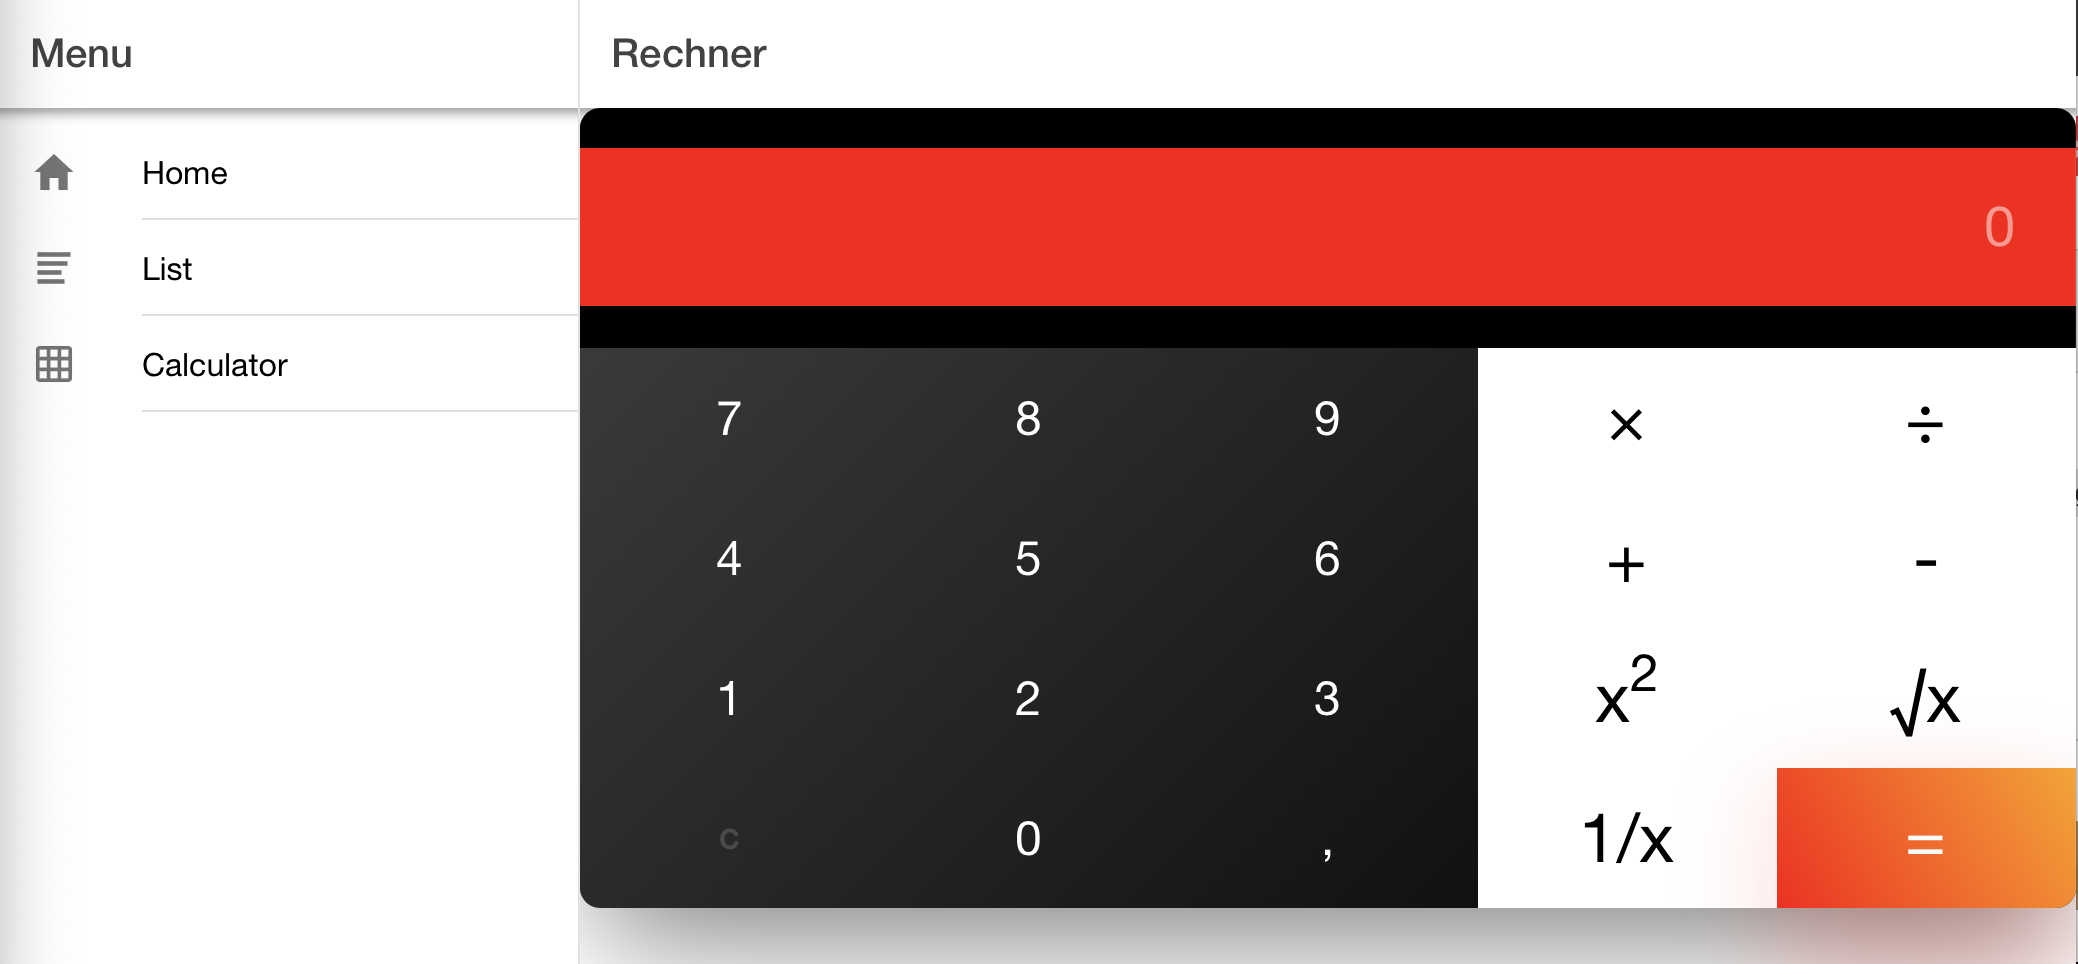
The layout of our page consists of a header row containing the result and 4 rows containing the buttons of our calculator.

Header
Row 1
Row 2
Row 3

Each row for our keys is build with 5 columns.

Header
Row1, Col1Row1, Col2Row1, Col3Row1, Col4Row1, Col5
Row2, Col1Row2, Col2Row2, Col3Row2, Col4Row2, Col5
Row3, Col1Row3, Col2Row3, Col3Row3, Col4Row3, Col5
Row4, Col1Row4, Col2Row4, Col3Row4, Col4Row4, Col5

Add within the table cells, we place our buttons

Header
789×÷
456+
123x2√x
C0,1/x=

We implement our layout with div’s instead of a html table.

So every row is a

<div class="row">
...
</div>

And within the row we define our buttons also as divs

<div class="number">
   <span (click)="btnClicked('4')">4</span>
   <span (click)="btnClicked('5')">5</span>
   <span (click)="btnClicked('6')">6</span>
</div>
<div class="symbol"><span (click)="btnClicked('+')">+</span></div>
<div class="symbol"><span (click)="btnClicked('-')">-</span></div>

The final html layout looks like this:

<ion-header>
  <ion-toolbar>
    <ion-buttons slot="start">
      <ion-menu-button></ion-menu-button>
    </ion-buttons>
    <ion-title>Rechner</ion-title>
  </ion-toolbar>
</ion-header>
<ion-content>
  <div class="calculator">
    <div class="header">
      <div class="window"></div>
      <div class="input"><span>
          <ion-input type="text" placeholder="0" name="display"
                     [(ngModel)]="result">
          </ion-input>
        </span></div>
    </div>
    <div class="keys">
      <div class="row">
        <div class="number">
          <span (click)="btnClicked('7')">7</span>
          <span (click)="btnClicked('8')">8</span>
          <span (click)="btnClicked('9')">9</span>
        </div>
        <div class="symbol"><span (click)="btnClicked('*')">×</span></div>
        <div class="symbol"><span (click)="btnClicked('/')">÷</span></div>
      </div>
      <div class="row">
        <div class="number">
          <span (click)="btnClicked('4')">4</span>
          <span (click)="btnClicked('5')">5</span>
          <span (click)="btnClicked('6')">6</span>
        </div>
        <div class="symbol"><span (click)="btnClicked('+')">+</span></div>
        <div class="symbol"><span (click)="btnClicked('-')">-</span></div>
      </div>
      <div class="row">
        <div class="number">
          <span (click)="btnClicked('1')">1</span>
          <span (click)="btnClicked('2')">2</span>
          <span (click)="btnClicked('3')">3</span>
        </div>
        <div class="symbol">
          <span (click)="btnClicked('square')">x<sup>2</sup></span>
        </div>
        <div class="symbol">
          <span (click)="btnClicked('squareroot')">√x</span>
        </div>
      </div>
      <div class="row">
        <div class="number">
          <span class=dull (click)="btnClicked('C')">C</span>
          <span (click)="btnClicked('0')">0</span>
          <span (click)="btnClicked(',')">,</span>
        </div>
        <div class="symbol">
          <span (click)="btnClicked('reciproc')">1/x</span>
        </div>
        <div class="symbol action">
          <span (click)="btnClicked('=')">=</span>
        </div>
      </div>
    </div>
  </div>
</ion-content>

Add css definitions

html,
body {
    width: 100%;
    height: 100%;
    margin: 0;
    padding: 0;
    font-family: "Trebuchet MS", Helvetica, sans-serif;
    font-size: 28px;
}
body {
    display: flex;
    justify-content: center;
    align-items: center;
    background-color: #f5f5f5;
}
.calculator {
    margin: 20px;
    widows: 100px;
    border-radius: 10px;
    box-shadow: 0 25px 60px -10px rgba(0, 0, 0, 0.5);
    .header {
        background-color: #000;
        height: 120px;
        border-radius: 10px 10px 0 0;
        .window {
            height: 15px;
            display: flex;
            justify-content: flex-start;
            padding: 10px;
            span {
                width: 10px;
                height: 10px;
                border-radius: 50%;
                margin-right: 5px;
                cursor: pointer;
                &.red {
                    background-color: #ff5252;
                }
                &.yellow {
                    background-color: #f5a623;
                }
                &.green {
                    background-color: #73c21d;
                }
            }
        }
        .input {
            background-color: #ff0300;
            color: #ffffff;
            padding: 10px 30px;
            font-size: 28px;
            span {
                text-align: right;
                color: #ffffff;
            }
        }
    }
    .keys {
        background: linear-gradient(135deg, #3a3a3a, #000000);
        height: 280px;
        border-radius: 0 0 10px 10px;
        font-size: 24px;
        .row {
            height: 70px;
            display: flex;
            flex-direction: row;
            .number {
                width: 75%;
                display: flex;
                color: #ffffff;
                span {
                    width: calc(100%/3);
                    height: 70px;
                    text-align: center;
                    display: flex;
                    justify-content: center;
                    align-items: center;
                    user-select: none;
                    cursor: pointer;
                }
            }
            .symbol {
                width: 25%;
                background-color: #ffffff;
                font-size: 34px;
                span {
                    width: 100%;
                    height: 70px;
                    text-align: center;
                    display: flex;
                    justify-content: center;
                    align-items: center;
                    user-select: none;
                    cursor: pointer;
                }
                &.action {
                    background: linear-gradient(60deg, #ff0300, #ffa100);
                    border-radius: 0 0 10px 0;
                    color: #ffffff;
                    box-shadow: 0 25px 60px -10px rgba(255, 10, 0, 0.5);
                }
            }
        }
    }
}
.dull {
    font-size: 14px;
    font-weight: bold;
    color: #4a4a4a;
}

Add javascript code for page

import { Component, OnInit } from '@angular/core';
@Component({
	selector: 'app-calculator1',
	templateUrl: './calculator.page.html',
	styleUrls: ['./calculator.page.scss'],
})
export class CalculatorPage implements OnInit {
	result = "";
	constructor() { }
	ngOnInit() {
	}
	btnClicked(btn) {
		console.log('CalculatorPage::btnClicked = ' + btn);
		if (btn == "C") {
			this.result = "";
		} else if (btn == "=") {
			this.result = eval(this.result);
		} else if (btn == "squareroot") {
			this.result = Math.sqrt(eval(this.result)) + "";
		} else if (btn == "square") {
			this.result = eval("(" + this.result + ") * ( " + this.result + ")");
		} else if (btn == "reciproc") {
			this.result = eval(1 + "/ (" + this.result + ")");
		} else {
			this.result += btn;
		}
	}
}

The final result

Installation on Unix

Prepare environment

Install nvm and Node

Change to users home and create users’s profile .bash_profile (if not exist)

cd $HOME
touch .bash_profile

Download nvm install script and run it. The installation script also modifies the users’s profile .bash_profile

curl -o- https://raw.githubusercontent.com/creationix/nvm/v0.33.11/install.sh | bash

Run users’s profile, so nvm will be installed. This ist done automatically after login.

. .bash_profile

Install latest Node LTS version

# install latest version
nvm install node --reinstall-packages-from=node

# install a specific version
npm -install 8.12.0

# set nvm aliases (used in direnv configuration)
nvm alias latest 8.12.0
nvm alias default 8.12.0

# install additional packages
npm -g install ionic@latest
npm -g install capacitor@latest

Create Ionic sample Apps

mkdir -p daten
cd daten
ionic start tabs tabs --type angular —-no-link
ionic start sidemen sidemenu --type angular —-no-link

Install direnv

Installation on mac OS. For more  information read here

brew install direnv

Installation on Linux

sudo apt-get update  <br>
sudo apt-get install direnv 

Configfile for direnv

#!/bin/bash

#-------------------------------------------------------------------------------

	SELF=$BASH_ARGV
	HERE="$(cd $(dirname "$SELF"); pwd)"
	SELF="$(basename "$SELF")"

#-------------------------------------------------------------------------------
PRINT()
{
	GRP="$1"; shift
	CMD="$1"; shift
	PAR="$*"

        printf 
}

#-------------------------------------------------------------------------------
	PRINT "config" "$HERE" "$SELF"

	PYTHON_VERSION=2.7.14
	NODE_VERSION=latest

	export NVM_DIR="$HERE/.env/nvm"

	PRINT "setup" "nvm" "$NVM_DIR"
	. /usr/local/opt/nvm/nvm.sh

	PRINT "set latest" "nvm" "$NODE_VERSION"
        nvm use $NODE_VERSION --silent

	PRINT "set latest" "pyenv" "$PYTHON_VERSION"
	pyenv local $PYTHON_VERSION 2>&-

	PRINT "Enabled" "nvm"      "$(nvm      --version)"
	PRINT "Enabled" "node"     "$(node     --version | sed '1,$s/v//g')"
	PRINT "Enabled" "npm"      "$(npm      --version)"
	PRINT "Enabled" "python"   "$(python   --version 2>&1)"
	PRINT "Enabled" "python2"  "$(python2  --version 2>&1)"

.bashrc

# setup direnv
eval "$(direnv hook bash)"

Node.js | Cookbook

Find out location of command

npm -g install which

Working with local repositories

Installieren des Node Modules npm_lazy

npm -g install npm_lazy

Konfigurationsdatei erstellen

npm_lazy --init >npm_lazy.js

npm_lazy starten

npm_lazy --config npm_lazy.js

Node-Umgebungen zur Nutzung des lokaln repositries konfiguieren

npm config set registry http://localhost:8080/

Ionic | App from Scratch – Adding Content

In this blog, we will discus the steps to add additional content (pages, components) to your existing app. We will start with the App From Scratch we create here.

Preparation

Configure Visual Studio Code

First, we will configure Visual Studio Code to show only the desired folders for this tutorial.

We will hide the folders node_modules, e2e and .env

To do this, select Code / Prefecences / Settings

Visual Studio Code will open the settings in a editor window. You will see the default user settings on the left, and the current user settings on the right.

Look for the lines unter “files.exclude” and add or edit the desired content.

Setting to true means exclude (remember the title of the group: files.exclude)

Open required windows

As we add some content, we want to see immediately the results.

So,  i opened three windows

  • Visual Studio Code
  • Browser Windows
  • Console, where we start the ionic server

Change directory structure

Now we can start: Lets add some pages we will use to contain Ionic Components (Buttons, Text, Switches, Lists, Grids, …)

Out app have 3 pages. You will find them in them explorer window

First, i want to change the directory structure.

For each component type, we will add, i want to a a separate folder.

So, first: create a folder pages for our pages

Next, move the pages folders home, list and about into the newly create folder

After that, go into the console, stop the running ionic serve command and restart it to force a new compilation of our app

$ ionic serve
> ng run app:serve --host=0.0.0.0 --port=8100

In the console window, we will see an error

[ng] ERROR in Could not resolve module ./home/home.module relative to .../app_from_scratch/src/app/app-routing.module.ts

This is, because we changes the directory path of the pages. We had to adjust the new path in out app: in app-routing.module.ts

const routes: Routes = [
  { path: '', redirectTo: 'home', pathMatch: 'full' },
  { path: 'home', loadChildren: './pages/home/home.module#HomePageModule' },
  { path: 'list', loadChildren: './pages/list/list.module#ListPageModule' },
  { path: 'about', loadChildren: './pages/about/about.module#AboutPageModule' }
];

Add page: ActionSheet

Ionic offers a huge amount of amazing components. So, we will demonstrate the use of this components step by step. We will take the inspiration from here.

Starting with Action Sheets.

  • Documentation is here
ionic generate page ActionSheet
> ng generate page ActionSheet
CREATE src/app/action-sheet/action-sheet.module.ts (569 bytes)
CREATE src/app/action-sheet/action-sheet.page.scss (0 bytes)
CREATE src/app/action-sheet/action-sheet.page.html (138 bytes)
CREATE src/app/action-sheet/action-sheet.page.spec.ts (727 bytes)
CREATE src/app/action-sheet/action-sheet.page.ts (279 bytes)
UPDATE src/app/app-routing.module.ts (736 bytes)
[OK] Generated page!

To add the new page to the sidemenu, change the AppPages array in app.component.ts

public appPages = [
  { title: 'Home', url: '/home', icon: 'home' },
  { title: 'List', url: '/list', icon: 'list' },
  { title: 'About', url: '/about', icon: '' },
  { title: 'ActionSheet', url: '/ActionSheet', icon: 'list' }
];

Notice the different spelling of the url (different case of letters). Whatever spelling you choose, it has to fit to the path value in the app-routing.module.ts

Next, move the page to the pages folder and change the path in app-routing.modules.ts

Add the sidemenu button to the actionSheet Page (in action-sheet.page.html)

<ion-header>
  <ion-toolbar>
    <ion-buttons slot="start">
      <ion-menu-button></ion-menu-button>
    </ion-buttons>
    <ion-title>ActionSheet</ion-title>
  </ion-toolbar>
</ion-header>

Ok, well done

Next, add a button and the code for displaying the action sheet. The source is here.

Change your html page: action-sheet.page.html

<ion-header>
  <ion-toolbar>
    <ion-buttons slot="start">
      <ion-menu-button></ion-menu-button>
    </ion-buttons>
    <ion-title>ActionSheet</ion-title>
  </ion-toolbar>
</ion-header>

<ion-content padding fullscreen>
  <ion-button expand="block" id="basic" (click)="presentBasic()">Basic</ion-button>
  <ion-button expand="block" id="noBackdropDismiss" (click)="presentNoBackdropDismiss()">No Backdrop Dismiss</ion-button>
  <ion-button expand="block" id="alertFromActionSheet" (click)="presentAlert()">Alert from Action Sheet</ion-button>
  <ion-button expand="block" id="scrollableOptions" (click)="presentScroll()">Scrollable Options</ion-button>
  <ion-button expand="block" id="scrollWithoutCancel" (click)="presentScrollNoCancel()">Scroll Without Cancel</ion-button>
  <ion-button expand="block" id="cancelOnly" (click)="presentCancelOnly()">Cancel Only</ion-button>
  <ion-button expand="block" id="icons" (click)="presentIcons()">Icons</ion-button>
  <ion-button expand="block" id="cssClass" (click)="presentWithCssClass()">Custom CSS Class</ion-button>
</ion-content>

Change your Style: action-sheet.page-scss

app-action-sheet {
}

Change the Code: action-sheet.page.ts. Source is here

import { Component, OnInit } from "@angular/core";
import { Platform, ActionSheetController } from "@ionic/angular";

@Component({
  selector: "app-action-sheet",
  templateUrl: "./action-sheet.page.html",
  styleUrls: ["./action-sheet.page.scss"]
})
export class ActionSheetPage implements OnInit {
  constructor(
    public platform: Platform,
    public actionSheetController: ActionSheetController
  ) {}

  ngOnInit() {}


  public changeColor(ev) {

  }

  async presentActionSheet() {
    const actionSheet = await this.actionSheetController.create({
      header: "Albums",
      buttons: [{
        text: 'Delete',
        role: 'destructive',
        icon: 'trash',
        handler: () => {
          console.log('Delete clicked');
        }
      }, {
        text: 'Share',
        icon: 'share',
        handler: () => {
          console.log('Share clicked');
        }
      }, {
        text: 'Play (open modal)',
        icon: 'arrow-dropright-circle',
        handler: () => {
          console.log('Play clicked');
        }
      }, {
        text: 'Favorite',
        icon: 'heart',
        handler: () => {
          console.log('Favorite clicked');
        }
      }, {
        text: 'Cancel',
        icon: 'close',
        role: 'cancel',
        handler: () => {
          console.log('Cancel clicked');
        }
      }]
    });
    await actionSheet.present();
  }

  async presentBasic() {
    console.log('ActionSheetPage:presentBasic');

    const actionSheet = await this.actionSheetController.create({
      header: "Albums",
      buttons: [{
        text: 'Delete',
        role: 'destructive',
        icon: 'trash',
        handler: () => {
          console.log('Delete clicked');
        }
      }, {
        text: 'Share',
        icon: 'share',
        handler: () => {
          console.log('Share clicked');
        }
      }, {
        text: 'Play (open modal)',
        icon: 'arrow-dropright-circle',
        handler: () => {
          console.log('Play clicked');
        }
      }, {
        text: 'Favorite',
        icon: 'heart',
        handler: () => {
          console.log('Favorite clicked');
        }
      }, {
        text: 'Cancel',
        icon: 'close',
        role: 'cancel',
        handler: () => {
          console.log('Cancel clicked');
        }
      }]
    });
    await actionSheet.present();
  }
  
  async presentIcons() {
    const actionSheetController = document.querySelector('ion-action-sheet-controller');
    await actionSheetController.componentOnReady();
    const actionSheetElement = await actionSheetController.create({
      header: "Albums",
      buttons: [{
        text: 'Delete',
        role: 'destructive',
        icon: 'trash',
        handler: () => {
          console.log('Delete clicked');
        }
      }, {
        text: 'Share',
        icon: 'share',
        handler: () => {
          console.log('Share clicked');
        }
      }, {
        text: 'Play (open modal)',
        icon: 'arrow-dropright-circle',
        handler: () => {
          console.log('Play clicked');
        }
      }, {
        text: 'Favorite',
        icon: 'heart',
        role: 'selected',
        handler: () => {
          console.log('Favorite clicked');
        }
      }, {
        text: 'Cancel',
        role: 'cancel',
        icon: 'close',
        handler: () => {
          console.log('Cancel clicked');
        }
      }]
    })
    await actionSheetElement.present();
  }
  
  async presentNoBackdropDismiss() {
    const actionSheetController = document.querySelector('ion-action-sheet-controller');
    await actionSheetController.componentOnReady();
    const actionSheetElement = await actionSheetController.create({
      backdropDismiss: false,
      buttons: [{
        text: 'Archive',
        handler: () => {
          console.log('Archive clicked');
        }
      }, {
        text: 'Destructive',
        role: 'destructive',
        handler: () => {
          console.log('Destructive clicked');
        }
      }, {
        text: 'Cancel',
        role: 'cancel',
        handler: () => {
          console.log('Cancel clicked');
        }
      }]
    });
    await actionSheetElement.present();
  }
  
  async presentAlert() {
    const actionSheetController = document.querySelector('ion-action-sheet-controller');
    await actionSheetController.componentOnReady();
    const actionSheetElement = await actionSheetController.create({
      buttons: [{
        text: 'Open Alert',
        handler: () => {
          console.log('Open Alert clicked');
        }
      }, {
        text: 'Cancel',
        role: 'cancel',
        handler: () => {
          console.log('Cancel clicked');
        }
      }]
    });
    await actionSheetElement.present();
  }
  
  async presentScroll() {
    const actionSheetController = document.querySelector('ion-action-sheet-controller');
    await actionSheetController.componentOnReady();
    const actionSheetElement = await actionSheetController.create({
      buttons: [
        {
          text: 'Add Reaction',
          handler: () => {
            console.log('Add Reaction clicked');
          }
        }, {
          text: 'Copy Text',
          handler: () => {
            console.log('Copy Text clicked');
          }
        }, {
          text: 'Share Text',
          handler: () => {
            console.log('Share Text clicked');
          }
        }, {
          text: 'Copy Link to Message',
          handler: () => {
            console.log('Copy Link to Message clicked');
          }
        }, {
          text: 'Remind Me',
          handler: () => {
            console.log('Remind Me clicked');
          }
        }, {
          text: 'Pin File',
          handler: () => {
            console.log('Pin File clicked');
          }
        }, {
          text: 'Star File',
          handler: () => {
            console.log('Star File clicked');
          }
        }, {
          text: 'Mark Unread',
          handler: () => {
            console.log('Mark Unread clicked');
          }
        }, {
          text: 'Edit Title',
          handler: () => {
            console.log('Edit Title clicked');
          }
        }, {
          text: 'Save Image',
          handler: () => {
            console.log('Save Image clicked');
          }
        }, {
          text: 'Copy Image',
          handler: () => {
            console.log('Copy Image clicked');
          }
        }, {
          text: 'Delete File',
          role: 'destructive',
          handler: () => {
            console.log('Delete File clicked');
          }
        }, {
          text: 'Cancel',
          role: 'cancel', // will always sort to be on the bottom
          handler: () => {
            console.log('Cancel clicked');
          }
        }
      ]
    });
    await actionSheetElement.present();
  }
  
  async presentScrollNoCancel() {
    const actionSheetController = document.querySelector('ion-action-sheet-controller');
    await actionSheetController.componentOnReady();
    const actionSheetElement = await actionSheetController.create({
      buttons: [
        {
          text: 'Add Reaction',
          handler: () => {
            console.log('Add Reaction clicked');
          }
        }, {
          text: 'Copy Text',
          handler: () => {
            console.log('Copy Text clicked');
          }
        }, {
          text: 'Share Text',
          handler: () => {
            console.log('Share Text clicked');
          }
        }, {
          text: 'Copy Link to Message',
          handler: () => {
            console.log('Copy Link to Message clicked');
          }
        }, {
          text: 'Remind Me',
          handler: () => {
            console.log('Remind Me clicked');
          }
        }, {
          text: 'Pin File',
          handler: () => {
            console.log('Pin File clicked');
          }
        }, {
          text: 'Star File',
          handler: () => {
            console.log('Star File clicked');
          }
        }, {
          text: 'Mark Unread',
          handler: () => {
            console.log('Mark Unread clicked');
          }
        }, {
          text: 'Edit Title',
          handler: () => {
            console.log('Edit Title clicked');
          }
        }, {
          text: 'Save Image',
          handler: () => {
            console.log('Save Image clicked');
          }
        }, {
          text: 'Copy Image',
          handler: () => {
            console.log('Copy Image clicked');
          }
        }, {
          text: 'Delete File',
          role: 'destructive',
          handler: () => {
            console.log('Delete File clicked');
          }
        }
      ]
    });
    await actionSheetElement.present();
  }
  
  async presentCancelOnly() {
    const actionSheetController = document.querySelector('ion-action-sheet-controller');
    await actionSheetController.componentOnReady();
    const actionSheetElement = await actionSheetController.create({
      buttons: [
        {
          text: 'Cancel',
          role: 'cancel', // will always sort to be on the bottom
          handler: () => {
            console.log('Cancel clicked');
          }
        }
      ]
    });
    await actionSheetElement.present();
  }
  
  async presentWithCssClass() {
    const actionSheetController = document.querySelector('ion-action-sheet-controller');
    await actionSheetController.componentOnReady();
    const actionSheetElement = await actionSheetController.create({
      header: "Custom Css Class",
      cssClass: "my-class my-custom-class",
      buttons: [
        {
          text: 'Test',
          role: 'test',
          cssClass: 'my-cancel-button my-custom-button customClass',
          handler: () => {
            console.log('Cancel clicked');
          }
        }
      ]
    });
    await actionSheetElement.present();
  }
}

Done. Now look at the result

Add page: Buttons

Add page: Toolbar Buttons

Migration

Vorbereitung / Installation

Hier findet ihr die genaue Beschreibung

npm i -D @ionic/v4-migration-tslint
npm i codelyzer

Erstellen einer JSON Datei ionic-migration.json

{
  "rulesDirectory": [
    "@ionic/v4-migration-tslint/rules"
  ],
  "rules": {
    "ion-action-sheet-method-create-parameters-renamed": true,
    "ion-alert-method-create-parameters-renamed": true,
    "ion-datetime-capitalization-changed": true,
    "ion-item-option-method-get-sliding-percent-renamed": true,
    "ion-back-button-not-added-by-default": { "options": [true], "severity": "warning" },
    "ion-button-attributes-renamed": true,
    "ion-button-is-now-an-element": true,
    "ion-chip-markup-has-changed": true,
    "ion-fab-button-is-now-an-element": true,
    "ion-fab-attributes-renamed": true,
    "ion-fab-fixed-content": true,
    "ion-col-attributes-renamed": true,
    "ion-icon-attribute-is-active-removed": true,
    "ion-item-is-now-an-element": true,
    "ion-item-ion-label-required": true,
    "ion-item-attributes-renamed": true,
    "ion-item-divider-ion-label-required": true,
    "ion-item-options-attribute-values-renamed": true,
    "ion-item-option-is-now-an-element": true,
    "ion-label-attributes-renamed": true,
    "ion-list-header-ion-label-required": true,
    "ion-menu-toggle-is-now-an-element": true,
    "ion-navbar-is-now-ion-toolbar": true,
    "ion-option-is-now-ion-select-option": true,
    "ion-radio-attributes-renamed": true,
    "ion-radio-slot-required": true,
    "ion-radio-group-is-now-an-element": true,
    "ion-range-attributes-renamed": true,
    "ion-spinner-attribute-values-renamed": true,
    "ion-tab-attributes-renamed": true,
    "ion-text-is-now-an-element": true,
    "ion-buttons-attributes-renamed": true
  }
}

Migration durchführen

npx tslint -c ionic-migration.json -p tsconfig.json

Flutter | Troubleshooting

Basic

flutter doctor

Error: Exception: Bad UTF-8 encoding
Solution: Use the current version of vswhere

Download from: https://github.com/microsoft/vswhere/releases

Store/overwrite: C:\Program Files (x86)\Microsoft Visual Studio\Installer\vswhere.exe

PS> Set-Location "C:\Program Files (x86)\Microsoft Visual Studio\Installer"                                                                                                                                              
PS> Move-Item vswhere.exe vswhere.exe.original
PS> Invoke-WebRequest https://github.com/microsoft/vswhere/releases/download/3.0.3/vswhere.exe -O vswhere.exe
Null safety features are disabled for this library.
lib/main.dart:8:19: Error: Null safety features are disabled for this library.
Try removing the package language version or setting the language version to 2.12 or higher.
  const MyApp({Key? key}) : super(key: key);
Solution: Edit pubspec.yaml
environment:
  sdk: '>=2.17.3 <3.0.0'

Migration Dart Plugins

import 'package:flutter/services.dart';
client =createHttpClient();


import 'package:http/http.dart' as http;
client = new http.Client();

Your app is not using AndroidX

GoTo Flutter_Project -> android -> gradle.properties file. Open the gradle.properties file in any Text editor.

Add below lines in this file and Save the file.

android.useAndroidX=true
android.enableJetifier=true

Open your Flutter Project Root directory in Command Prompt or Terminal and execute

flutter clean

Flutter | Getting started

Installation

Installation of Flutter

Details are here

Installation of Dart SDK

Details are here

$ brew tap dart-lang/dart
$ brew install dart --devel

Create your first App

Copied from here and here

Create the starter Flutter app

$ flutter create starter
$ cd starter

Run Flutter App on the Web

$ flutter config --enable-web
$ flutter build web

Run Flutter App on Android Emulator

$ flutter devices
$ flutter run [--verbose]
$ flutter emulators
5 available emulators:

Android_Accelerated_Oreo
Nexus_5X_API_28_x86      • Nexus 5X      • Google • Nexus 5X API 28 x86
Pixel_3_API_28           • pixel_3       • Google • Pixel 3 API 28
Pixel_XL_API_28          • pixel_xl      • Google • Pixel XL API 28
apple_ios_simulator      • iOS Simulator • Apple

To run an emulator, run 'flutter emulators --launch <emulator id>'.
To create a new emulator, run 'flutter emulators --create [--name xyz]'.
$ flutter emulators --launch apple_ios_simulator

Read More

Official websitehttps://flutter.io/ will supply from step by step to install and start with the simple example.

Dart language

Flutter training online

Google CodeLab: https://codelabs.developers.google.com/?cat=Flutter

Flutter Samples: https://github.com/flutter/samples

Flutter Cookbook: https://flutter.dev/docs/cookbook

Github Awesome-Flutter

Flutter challenge series has been building by Matt Carroll who is owners of Fluttery (Youtube channel https://www.youtube.com/fluttery)

Blogs 

App builder: It is an amazing tool to build the Flutter UI online that mean you only need choose your UI widget and drag to screen -> You can get the source code for your app.

The Flutter Pub is a medium publication to bring you the latest and amazing resources such as articles, videos, codes, podcasts, etc. about this great

What’s next

  • Learn Dart
    Go to Dart guides and see a preview of the four most visited websites. Initially, these two are worth focusing on: Language tour and Language samples. A complete and detailed Dart course supported by examples can also be found here.
  • Install Flutter SDK – Prepare IDE
    The entire process is described step by step depending on the system on which we want to install Flutter.
  • Study Material Design Concept
    If we want to create user-friendly interfaces, it is important to read material design rules. 
  • Widgets
    Widgets are an indispensable part of Flutter. You can browse them alphabetically.
  • API Calls and Database Integration
    The Pub provides great packages such as: http or dio to perform HTTP requests. Hive is a lightweight and blazing fast key-value database written in pure Dart. You should also consider integrating with Firebase.

Links

Angular | Starting with Capacitor

Introduction

Install Angular

$ npm -g install @angular/cli

Create sample app

❯ ng new app-capacitor
? Would you like to add Angular routing? Yes
? Which stylesheet format would you like to use? SCSS   [ https://sass-lang.com/documentation/syntax#scss]

❯ cd app-capacitor

Change output path to capacitor defaults

Change line in angular.json

      "architect": {
        "build": {
          "builder": "@angular-devkit/build-angular:browser",
          "options": {
            "outputPath": "dist",

 Add capacitor support

❯ ng add @capacitor/angular
ℹ Using package manager: npm
✖ Unable to find compatible package.  Using 'latest'.
✖ Package has unmet peer dependencies. Adding the package may not succeed.

The package @capacitor/angular will be installed and executed.
Would you like to proceed? Yes

Capacitor initialisieren

❯ npx cap init
[?] What is the name of your app?
    This should be a human-friendly app name, like what you'd see in the App Store.
√ Name ... app-capacitor
[?] What should be the Package ID for your app?
    Package IDs (aka Bundle ID in iOS and Application ID in Android) are unique identifiers for apps. They must be in
    reverse domain name notation, generally representing a domain name that you or your company owns.
√ Package ID ... com.example.app
√ Creating capacitor.config.ts in D:\CLOUD\Online-Seminare\Kurse\Angular\Einsteiger\App_Capacitor in 5.31ms
[success] capacitor.config.ts created!

Next steps:
https://capacitorjs.com/docs/v3/getting-started#where-to-go-next
[?] Join the Ionic Community! 💙
    Connect with millions of developers on the Ionic Forum and get access to live events, news updates, and more.
√ Create free Ionic account? ... no
[?] Would you like to help improve Capacitor by sharing anonymous usage data? 💖
    Read more about what is being collected and why here: https://capacitorjs.com/telemetry. You can change your mind at
    any time by using the npx cap telemetry command.
√ Share anonymous usage data? ... no

Build your app

We will need the dist directory with the web files

❯ ng build --prod
Option "--prod" is deprecated: No need to use this option as this builder defaults to configuration "production".
✔ Browser application bundle generation complete.
✔ Copying assets complete.
✔ Index html generation complete.

Initial Chunk Files               | Names         |      Size
main.b633c9096acdb457c421.js      | main          | 212.34 kB
polyfills.e4574352eda6eb439793.js | polyfills     |  35.95 kB
runtime.d66bb6fe709ae891f100.js   | runtime       |   1.01 kB
styles.31d6cfe0d16ae931b73c.css   | styles        |   0 bytes

                                  | Initial Total | 249.29 kB

Build at: 2021-05-28T09:32:28.905Z - Hash: ed2ed2d661b0d58b48f2 - Time: 28225ms
❯ npm install @capacitor/ios @capacitor/android
npm WARN @capacitor/angular@1.0.3 requires a peer of rxjs@~6.4.0 but none is installed. You must install peer dependencies yourself.
npm WARN @capacitor/angular@1.0.3 requires a peer of typescript@~3.4.3 but none is installed. You must install peer dependencies yourself.
npm WARN ajv-keywords@3.5.2 requires a peer of ajv@^6.9.1 but none is installed. You must install peer dependencies yourself.
npm WARN optional SKIPPING OPTIONAL DEPENDENCY: fsevents@2.3.2 (node_modules\fsevents):
npm WARN notsup SKIPPING OPTIONAL DEPENDENCY: Unsupported platform for fsevents@2.3.2: wanted {"os":"darwin","arch":"any"} (current: {"os":"win32","arch":"x64"})
npm WARN optional SKIPPING OPTIONAL DEPENDENCY: fsevents@1.2.13 (node_modules\webpack-dev-server\node_modules\fsevents):
npm WARN notsup SKIPPING OPTIONAL DEPENDENCY: Unsupported platform for fsevents@1.2.13: wanted {"os":"darwin","arch":"any"} (current: {"os":"win32","arch":"x64"})

+ @capacitor/ios@3.0.0
+ @capacitor/android@3.0.0
added 2 packages from 1 contributor, removed 1 package and audited 1375 packages in 7.385s

88 packages are looking for funding
  run `npm fund` for details

found 35 moderate severity vulnerabilities
  run `npm audit fix` to fix them, or `npm audit` for details

Add Platform Android

❯ npx cap add android
√ Adding native android project in android in 167.07ms
√ Syncing Gradle in 1.45ms
√ add in 169.83ms
[success] android platform added!
Follow the Developer Workflow guide to get building:
https://capacitorjs.com/docs/v3/basics/workflow
√ Copying web assets from dist to android\app\src\main\assets\public in 55.26ms
√ Creating capacitor.config.json in android\app\src\main\assets in 3.50ms
√ copy android in 164.93ms
√ Updating Android plugins in 7.76ms
√ update android in 75.79ms

Open Android Studio to build App

❯ npx cap open android
[info] Opening Android project at: android.